This tutorial provides a step-by-step guide on using HTML forms for free with Google Sheets. Perfect for any website, it can be easily integrated into static site generators (SSGs) like Astro, Hugo, Eleventy etc as well as popular CMS such as Ghost, Blogger and Drupal.
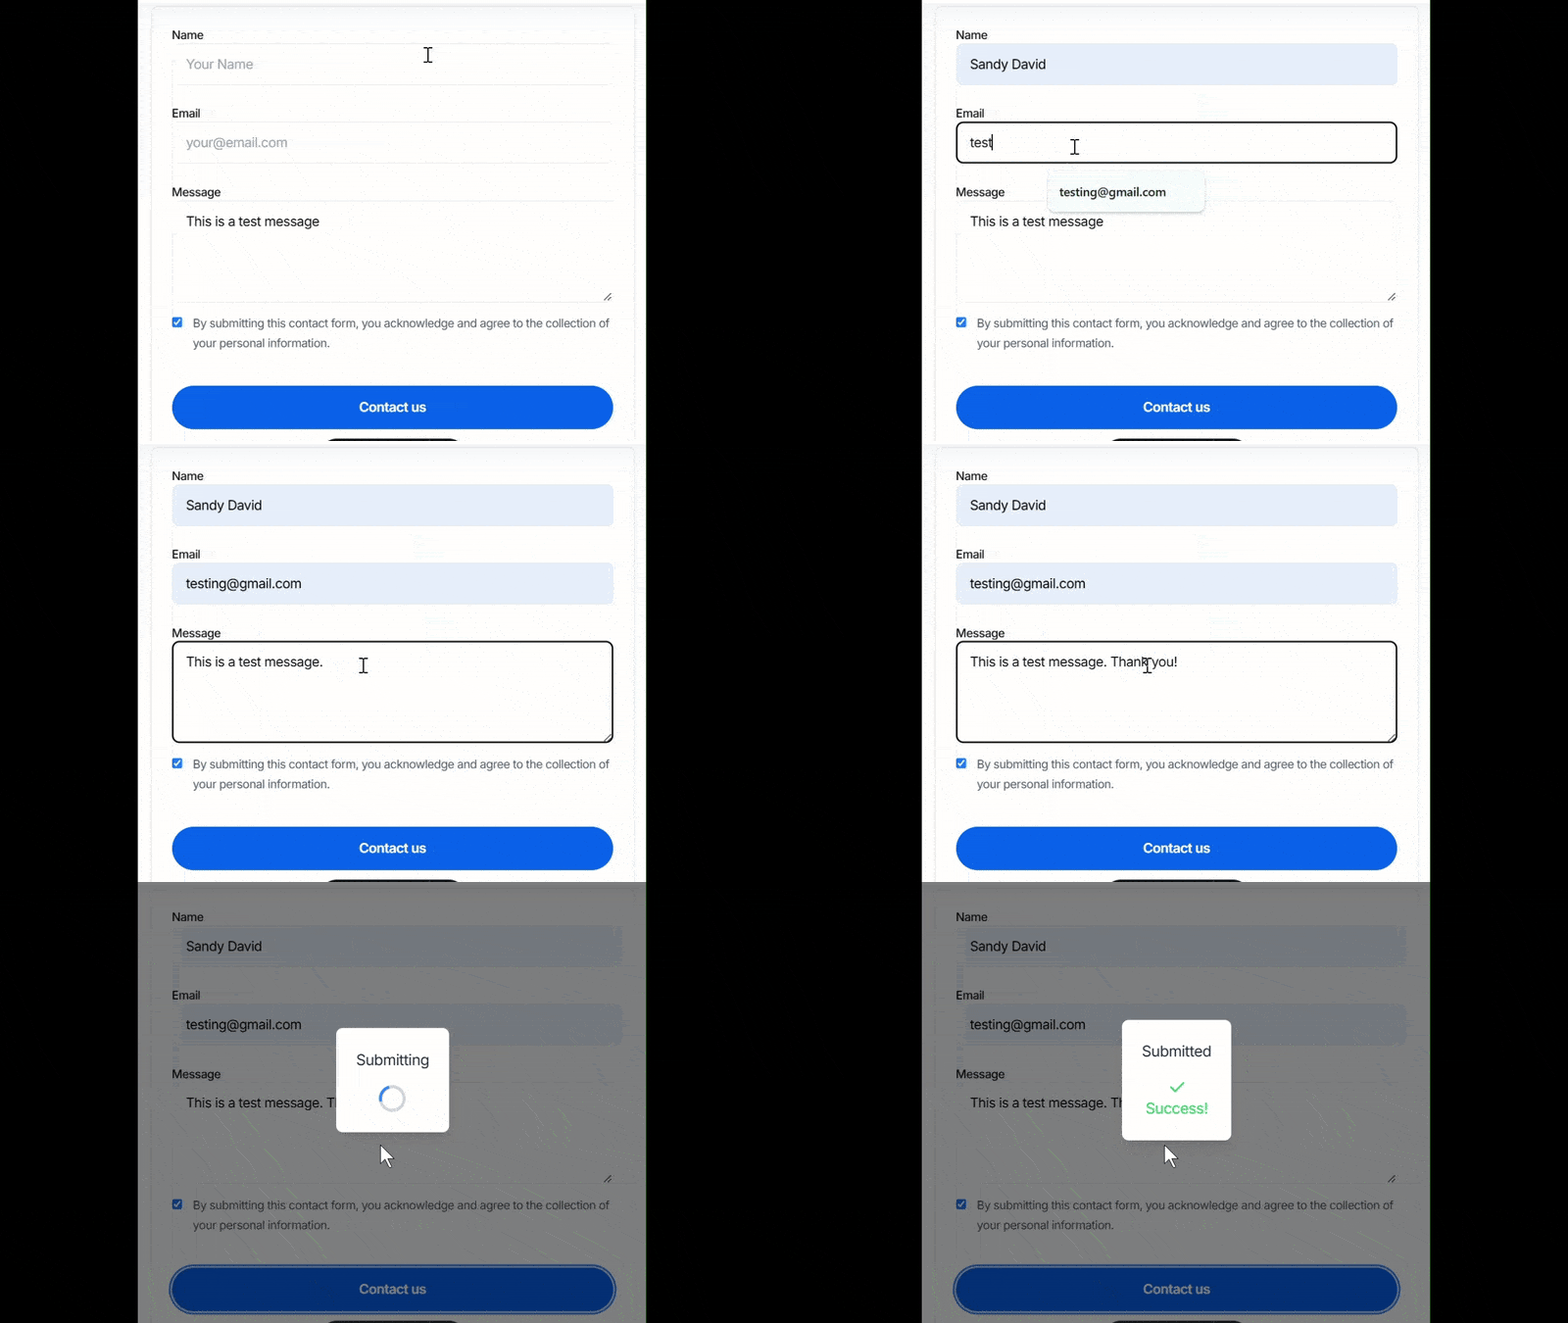
Features
- 100% Free: No monthly or daily limits.
- Email Notifications: Get alerts when forms are submitted.
- Store Data: Save all form submissions in Google Sheets.
- Fully Customized: Make it fit your needs.
Steps to Connect HTML Form to Google Sheets
Please follow the steps below how to collect HTML form responses in Google Sheets for free.
1. Create a Google Sheet
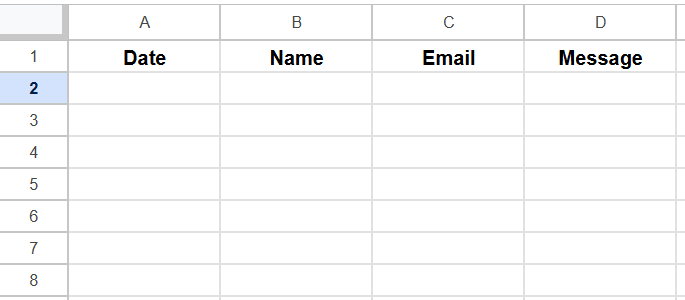
Start by creating a new Google Sheet where the form submissions will be stored. Enter these columns in first row - Date, Name, Email and Message.
2. Set Up Google Apps Script
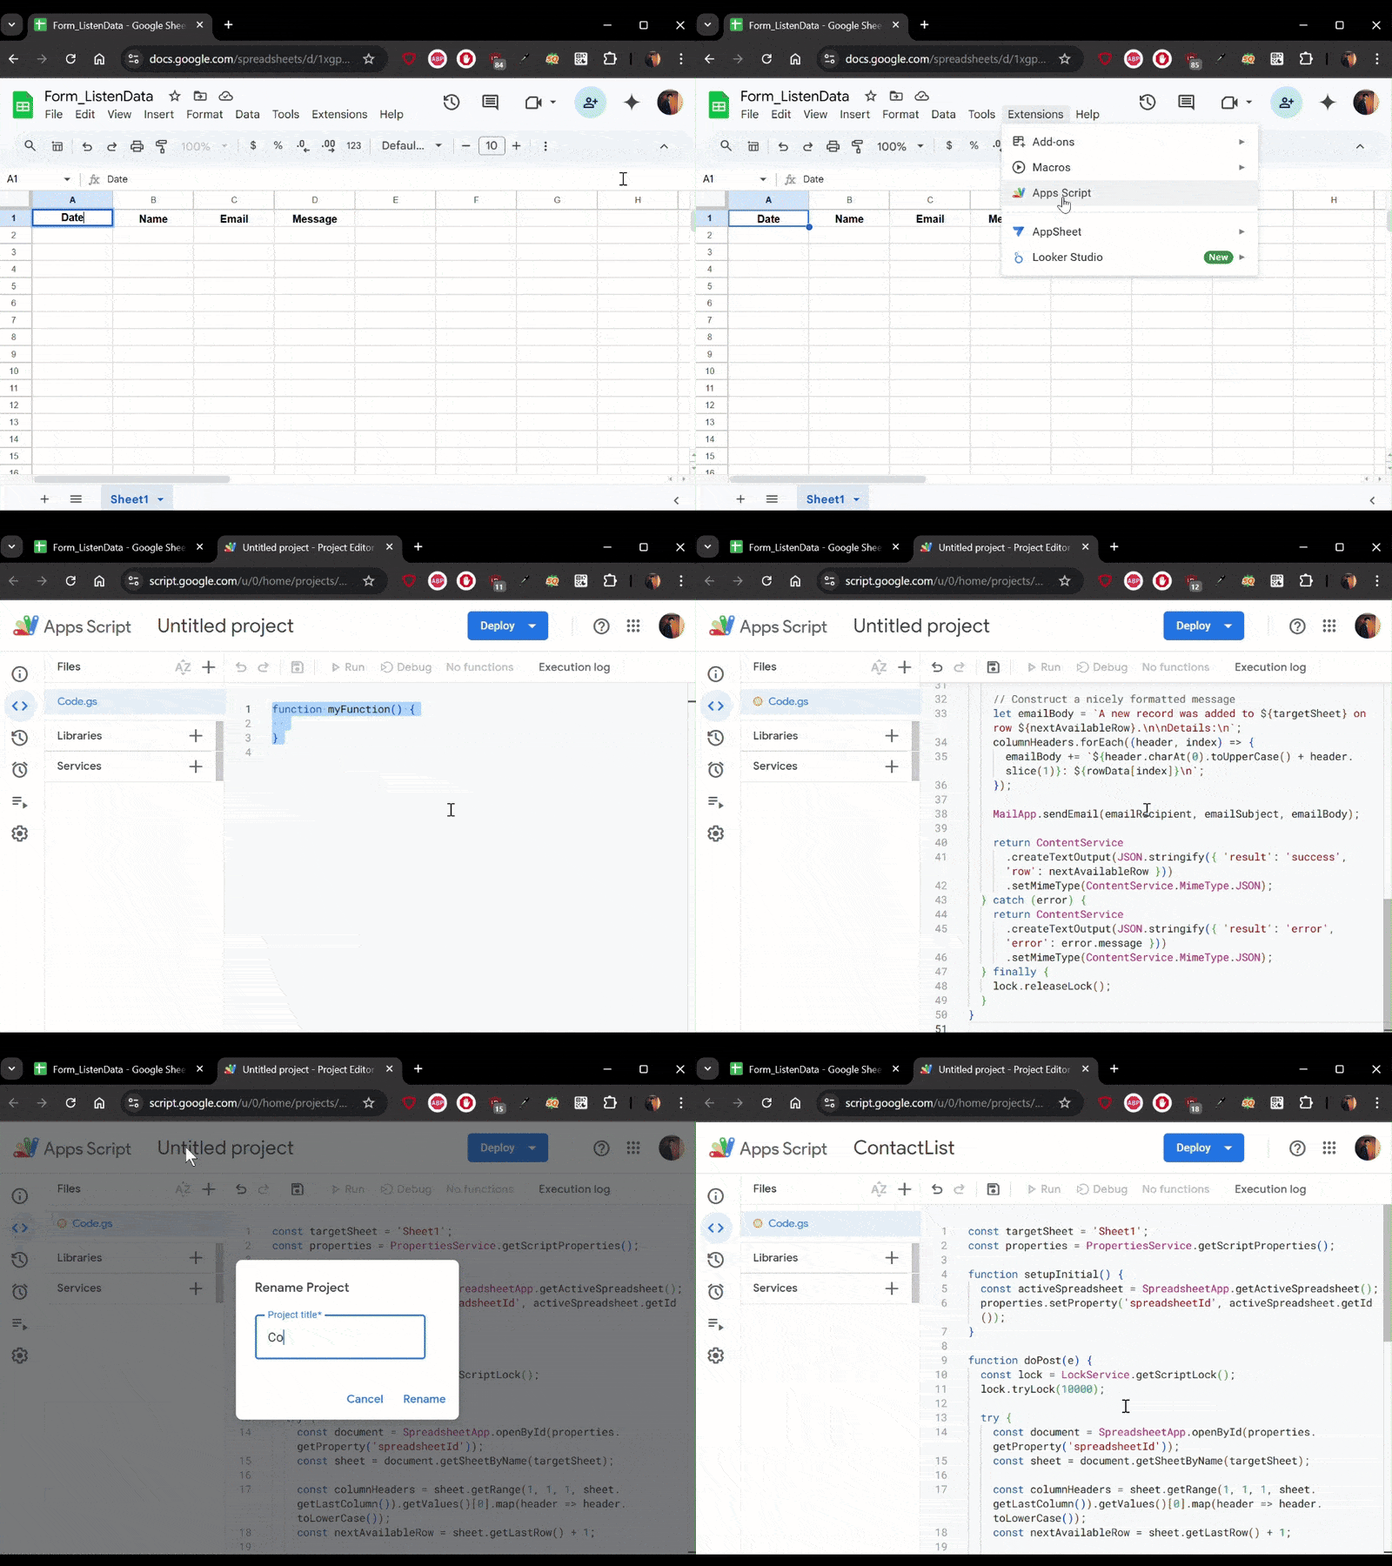
- Open your Google Sheet, click on Extensions > Apps Script to access the Apps Script editor.
- In the Apps Script editor, remove the existing
myFunction()function and then paste the following script to handle the form submissions. This script will process the incoming data from your HTML form. - In the script, enter your email in
emailRecipientvariable. You can also change subject of email by editing thisemailSubjectvariable. - Rename project to anything you like.
const targetSheet = 'Sheet1';
const properties = PropertiesService.getScriptProperties();

function setupInitial() {
  const activeSpreadsheet = SpreadsheetApp.getActiveSpreadsheet();
  properties.setProperty('spreadsheetId', activeSpreadsheet.getId());
}

function doPost(e) {
  const lock = LockService.getScriptLock();
  lock.tryLock(10000);

  try {
    const document = SpreadsheetApp.openById(properties.getProperty('spreadsheetId'));
    const sheet = document.getSheetByName(targetSheet);

    const columnHeaders = sheet.getRange(1, 1, 1, sheet.getLastColumn()).getValues()[0].map(header => header.toLowerCase());
    const nextAvailableRow = sheet.getLastRow() + 1;

    const params = {};
    for (let key in e.parameter) {
      params[key.toLowerCase()] = e.parameter[key];
    }

    const rowData = columnHeaders.map(header => (header === 'date' ? new Date() : params[header] || ''));
    sheet.getRange(nextAvailableRow, 1, 1, rowData.length).setValues([rowData]);

    // Improved email formatting
    const emailRecipient = 'youremail@email.com';  // Replace with your email
    const emailSubject = 'New Inquiry Recorded';

    // Construct a nicely formatted message
    let emailBody = `A new record was added to ${targetSheet} on row ${nextAvailableRow}.\n\nDetails:\n`;
    columnHeaders.forEach((header, index) => {
      emailBody += `${header.charAt(0).toUpperCase() + header.slice(1)}: ${rowData[index]}\n`;
    });

    MailApp.sendEmail(emailRecipient, emailSubject, emailBody);

    return ContentService
      .createTextOutput(JSON.stringify({ 'result': 'success', 'row': nextAvailableRow }))
      .setMimeType(ContentService.MimeType.JSON);
  } catch (error) {
    return ContentService
      .createTextOutput(JSON.stringify({ 'result': 'error', 'error': error.message }))
      .setMimeType(ContentService.MimeType.JSON);
  } finally {
    lock.releaseLock();
  }
}
3. Run the Script
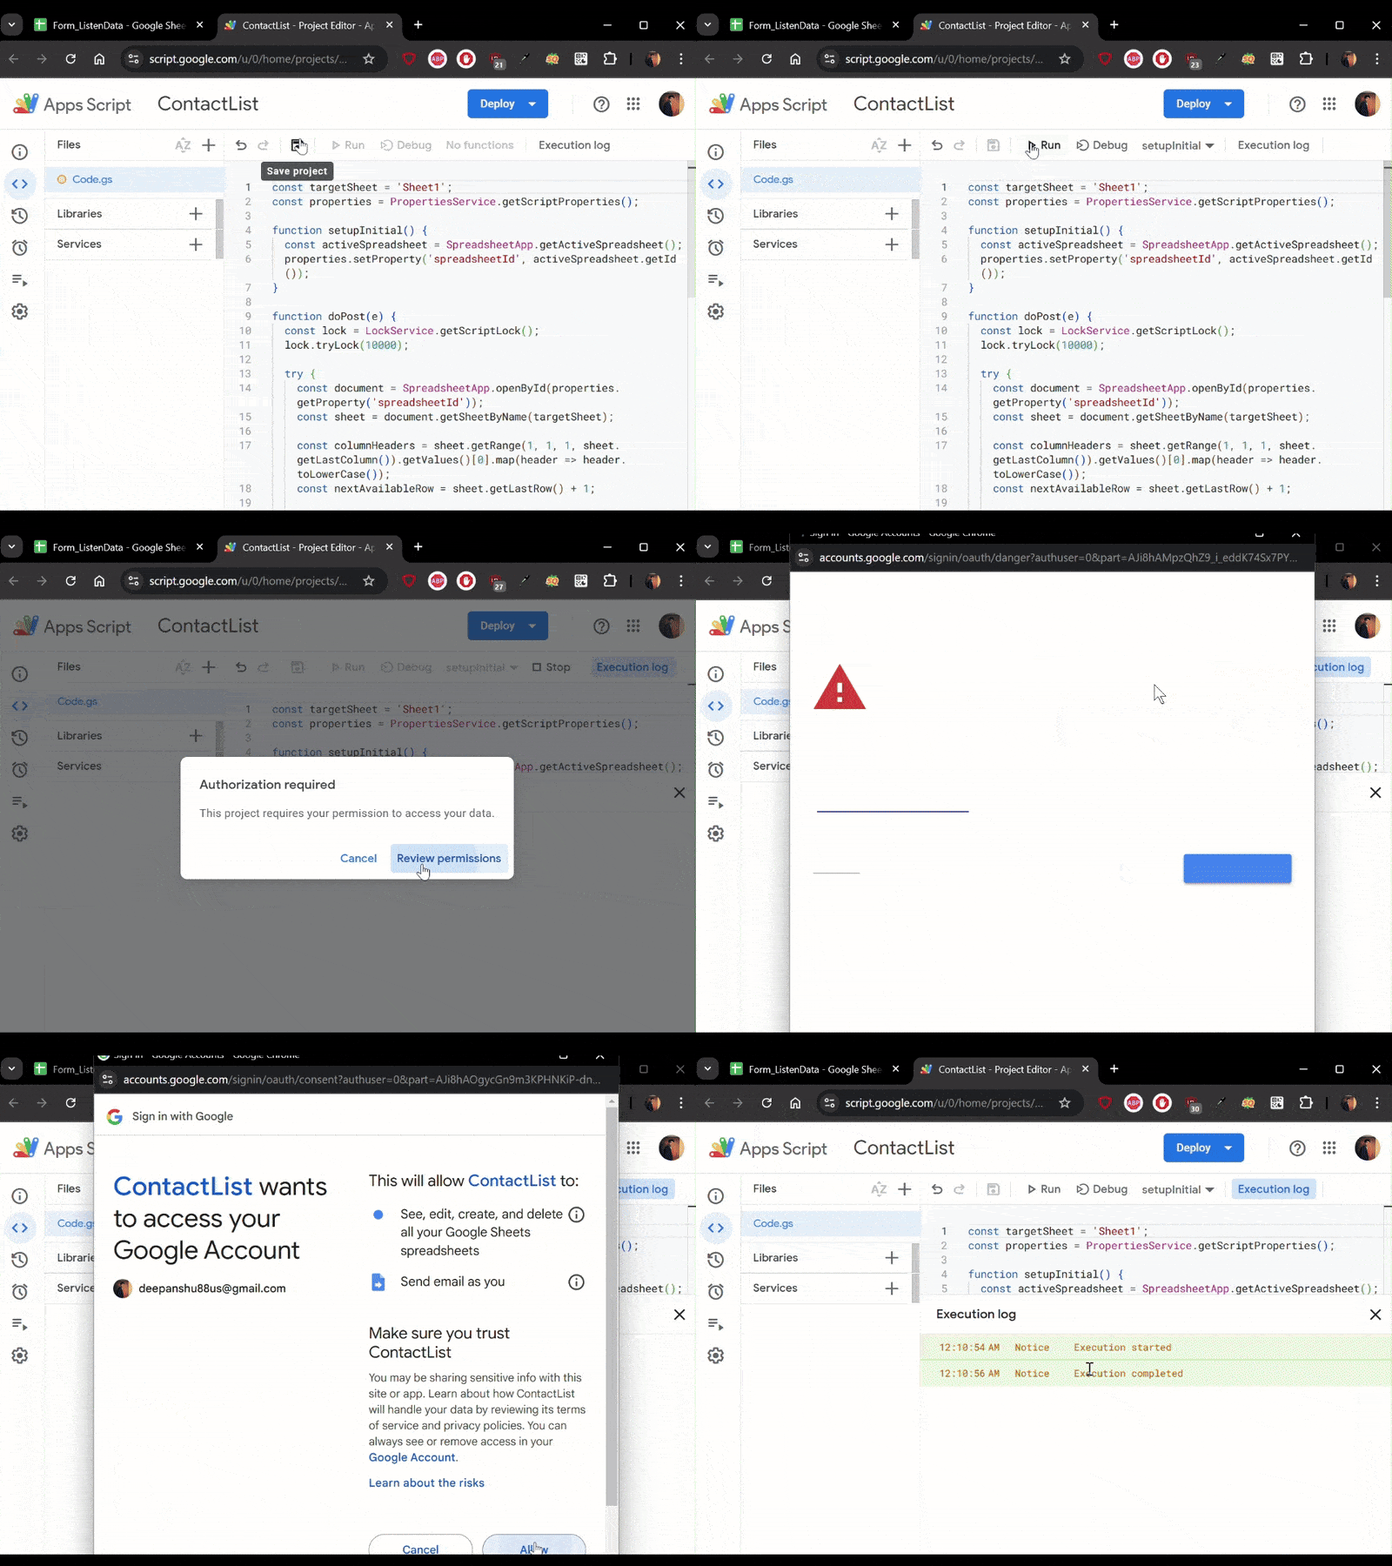
- Please make sure to save the project. Once saved, Run button will be visible and then click on it.
- You will see a popup asking for permissions. Click Review permissions to go to the next screen.
- A warning will show up as google has not tested this new script before. Click Go to Project (unsafe) to give the script the permissions it needs.
- Execution will be started and shown in the execution log window.
4. Add Trigger
Choose the "Triggers" project from the sidebar and click the Add Trigger button.

In the popup window, select these options:
- Choose which function to run:
doPost - Choose which deployment should run:
Head - Select event source:
From spreadsheet - Select event type:
On form submit - Failure Notification Settings:
Notify me immediately
Click Save button to save the above settings.
5. Deployment
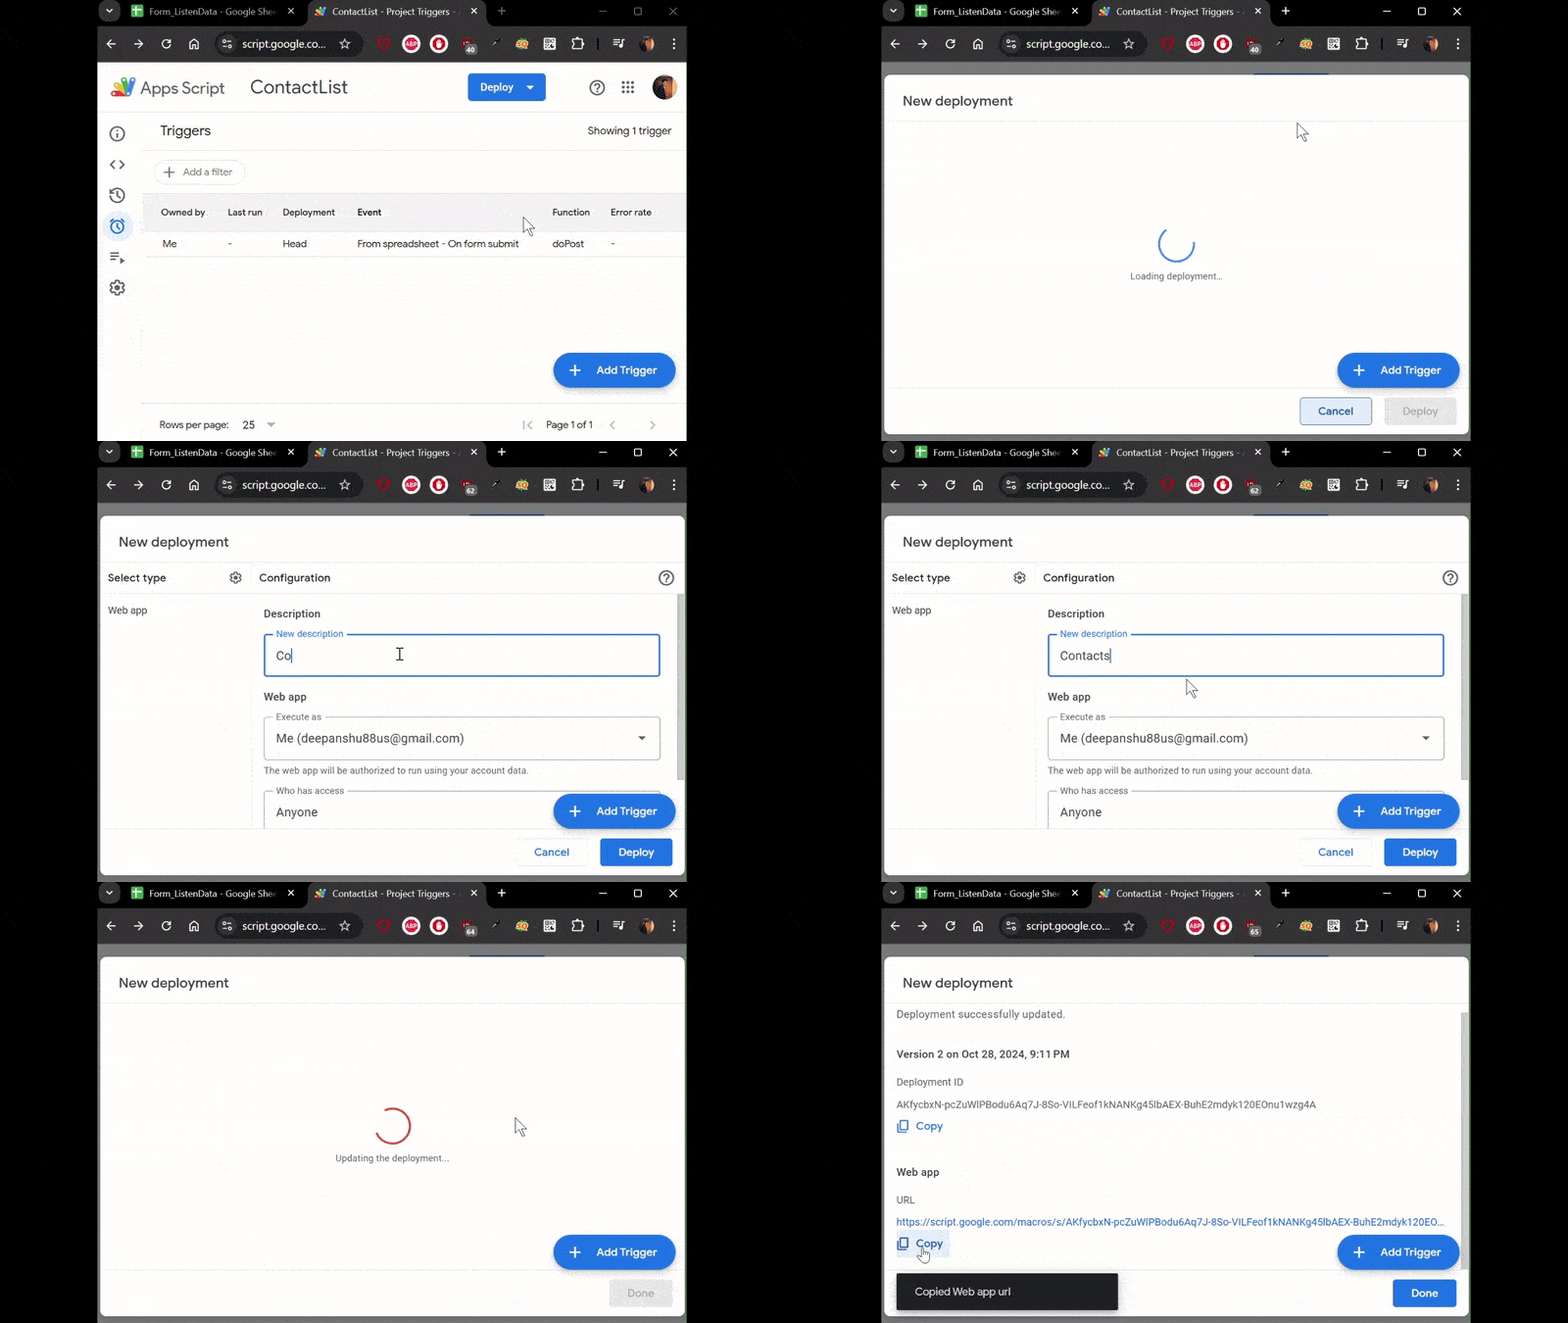
Click on the Deploy button and select New Deployment from the dropdown menu.
Next, click the Select type icon and choose Web app.
In the form that appears, select the following options:
- Description: Any name you want.
- Execute As: Me
- Who has access: Anyone
After that, click Deploy button and then copy the Web app URL.
6. Create HTML Form
Refer to the code below to create an online form and replace action="WEBAPP_URL" with your URL you got in the previous step.
HTML
<div class="main-container">
  <div class="form-container">
    <form action="https://script.google.com/macros/s/xxxxxxxxx/exec" method="POST" id="formId">
      <div class="mb-5">
        <label for="name" class="form-label">Full Name</label>
        <input type="text" name="name" id="name" placeholder="Full Name" class="form-input" required />
      </div>

      <div class="mb-5">
        <label for="email" class="form-label">Email Address</label>
        <input type="email" name="email" id="email" placeholder="Enter your email" class="form-input" required />
      </div>
      <div class="mb-5">
        <label for="message" class="form-label">Message</label>
        <textarea rows="6" name="message" id="message" placeholder="Enter your message" class="form-input" required></textarea>
      </div>

      <div>
        <button type="submit" class="btn">Submit</button>
      </div>
    </form>
  </div>
</div>
CSS
.main-container {
  display: flex;
  align-items: center;
  justify-content: center;
  padding: 48px 32px;
}
.form-container {
  margin: 0 auto;
  max-width: 550px;
  width: 100%;
  background: white;
  margin-left: -16px;
  margin-top: -50px;
}
.mb-5 {
  margin-bottom: 20px;
}
.form-label {
  display: block;
  font-weight: 500;
  font-size: 16px;
  color: #07074d;
  margin-bottom: 12px;
}
.form-input {
  width: 100%;
  padding: 12px 24px;
  border-radius: 6px;
  border: 1px solid#e0e0e0;
  background: white;
  font-weight: 500;
  font-size: 16px;
  color: #6b7280;
  outline: none;
  resize: none;
}
.form-input:focus {
  border-color: #6a64f1;
  box-shadow: 0px 3px 8px rgba(0, 0, 0, 0.05);
}
.btn {
  text-align: center;
  font-size: 16px;
  border-radius: 6px;
  padding: 14px 32px;
  border: none;
  font-weight: 600;
  background-color: #e54034;
  color: white;
  cursor: pointer;
}
#message {
  width: 600px;
  min-width: 300px;
  resize: vertical;
  box-sizing: border-box;
}
@media (max-width: 600px) {
  #message {
    width: 100%;
    max-width: none;
  }
}
Javascript
window.addEventListener("load", function () {
  const form = document.getElementById("formId");
  form.addEventListener("submit", function (e) {
    e.preventDefault();
    const data = new FormData(form);
    const action = e.target.action;
    fetch(action, {
      method: "POST",
      body: data
    })
      .then((response) => {
        if (response.ok) {
          alert("Success!");
        } else {
          alert("Error submitting form");
        }
      })
      .catch((error) => {
        alert("An error occurred: " + error.message);
      });
  });
});
Important Note : Make sure column names of google sheets and input names of form are same.
Once user submits form, you will get email notification as shown below.
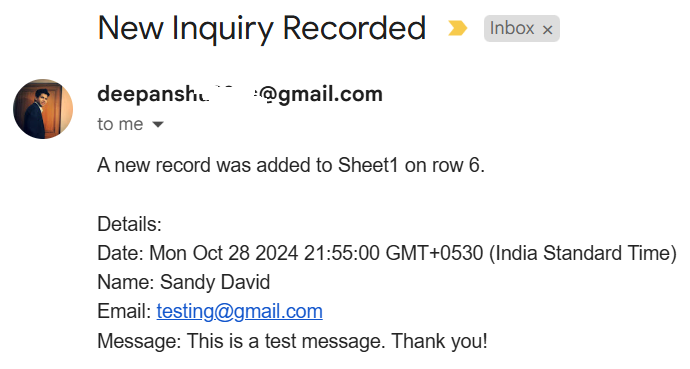
Also users' data will be appended to your google sheets.


Share Share Tweet